
I wrote this tutorial and any resemblance is just by chance.
Tube is by Zindy D. Nielsen and you can find her work at Shop
The tube I am using is called Blue Butterflies and you can find it Here
The zip includes word art, a butterfly layer, colors, as well as my blinkies. Zip
I want to thank Zindy for letting me use her tube for this tutorial.
This is a three part tutorial.
Signature tag


A Facebook timeline


Step One
- Open your tube then copy and paste as not to ruin the original file.
Open a new window 650 x 250 this will be for the signature tag.
- Change to your brush tool and take one of the colors from the color palette. ( if you did not have one made then choose a color from the tube you are using.
- Make a dot with 5 to 6 colors from your tube across the window
- Using Simple plug in zoom-out and flip once
- Using Simple plug in again this time Diamonds x4 times

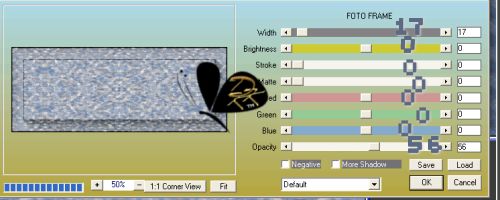
- Using the plug in AAA Foto Frame Foto Frame with the below seeings
- Using the selection tool, Select the center of your window ( the inner frame). Fill this with a medium color (mine is this #5a6a85):

- Keep your selection and open the butterfly layer. Copy this and paste as new layer on your working window.

- add new layer for frame
- Go to select tool down to modify then down to Select Selection Border and set to 5 px inside and fill with medium or dark color:
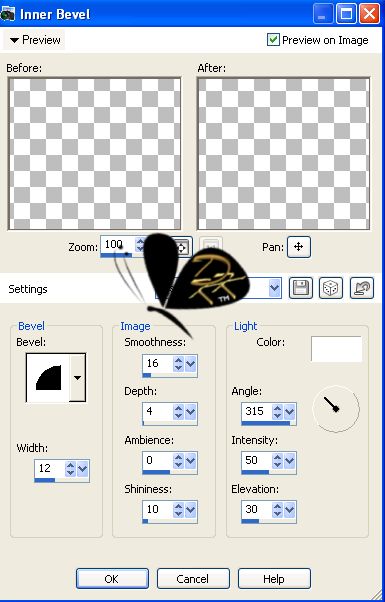
- Add bevel with these settings:You should have something like this after doing the bevel:
- Deselect by going to the select menu and choosing deselect or using your keyboard (control +d)
- Taking your tube size down to fit and place to the left size as I did:

- Open one of the word art or add your own , here I have added one that I put in the zip.

- Here I added the butterfly moved the layer under the word art( side note this butterfly came with the tube):

- Add copyright information and license #:

- Add name:

Step Two Signature Av match
- open a new window 150 x150
- From your new signature tag Select the tube with the background
- Copy this to your new window
- Using the AAA Foto Frame with the same settings:
- Add Letter or name:

- add copyright info ( most let you put just cc then your license with out the website info)
Step Three Time line
- Open a new window 853 x 315
- Change to your brush tool and take one of the colors from the color palette. ( if you did not have one made then choose a color from the tube you are using.
- Make a dot with 5 to 6 colors from your tube across the window
- Using Simple plug in zoom-out and flip once
- Using Simple plug in again this time Diamonds x4 times
-
- Using the plug in AAA Foto Frame Foto Frame with the below seeings
- Using the selection tool, Select the center of your window ( the inner frame). Fill this with a medium color (mine is this #5a6a85):
- Keep your selection and open the butterfly layer. Copy this and paste as new layer on your working window.
- add new layer for frame
- Go to select tool down to modify then down to Select Selection Border and set to 5 px inside and fill with medium or dark color:
- Add bevel with these settings:You should have something like this after doing the bevel:
- Deselect by going to the select menu and choosing deselect or using your keyboard (control +d)
- Taking your tube size down to fit and place to the left size as I did:
- Open one of the word art or add your own , here I have added one that I put in the zip.
-
- Here I added the butterfly moved the layer under the word art( side note this butterfly came with the tube):
- Add copyright information and license #:
- Add name:( this is optional for the time line)


|